React MUI如何自定义
React MUI 是一个UI库,提供了功能齐全的组件,为我们的生产就绪组件引入了自己的设计系统。MUI是一个用户界面库,为更快速、简便的Web开发提供了预定义和可自定义的React组件,这些Material-UI组件是基于Google的Material Design。
React MUI如何自定义 是修改Material-UI库中组件的默认样式和行为,以适应项目或应用的特定需求的过程。此自定义可能包括更改颜色、字体、布局和其他设计元素,以匹配项目的外观和感觉。
如何自定义内容:
- 一次性自定义: 它指的是对单个实例的特定组件进行默认样式的小改变,而不是创建全局主题或自定义特定组件的所有实例。可以通过使用’sx’属性、使用类名覆盖样式或使用状态类来实现。
- 可重用组件: 它是指可以在应用程序的多个位置中使用的组件,而不是特定于单个位置或页面。这些组件可以使用’styled’函数进行自定义,该函数会覆盖特定组件的默认样式。
- 全局主题覆盖: 它指的是通过创建全局主题来自定义应用程序中所有组件的默认样式的过程。可以通过使用 ‘createTheme’ 函数创建一个新的主题对象,覆盖各种样式选项的默认值,如颜色、字体和间距。创建主题后,可以将其传递给 ‘ThemeProvider’ 组件。
- 全局CSS覆盖: 它指的是通过应用全局CSS样式来自定义应用程序中所有组件的默认样式的过程。可以通过将包含自定义样式的CSS文件导入到应用程序的根目录中,或使用 ‘GlobalStyles’ 组件创建一个全局样式组件,该组件可用于将样式应用于整个应用程序中的特定元素或类。
创建React项目:
步骤1: 通过在任何命令行中编写以下代码来创建React应用程序。
npx create-react-app app_name
步骤2: 然后,我们要进入我们要工作的文件夹。
cd project_name
步骤3: 我们将安装 @mui/material 库来进行项目开发。
npm install @mui/material @emotion/react
npm install @emotion/styled @mui/icons-material
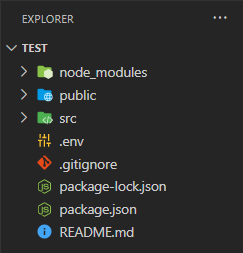
项目结构:

运行应用程序的步骤: 在终端中写入以下代码以运行服务器:
npm start
示例1: 下面是使用‘sx’属性对Box组件进行样式设置的代码。
- App.js
import styled from "@emotion/styled";
import { Box } from '@mui/material';

const Text = styled.div`
    padding-left: 10px;
    padding-right: 5px;
`;

const Logo =
'https://media.geeksforgeeks.org/wp-content/uploads/20230104121959/logo.jpg';

const SimpleExample = () => {
    return (
        <Box sx={{
            width: '200px', height: '400px', boxShadow: 2,
            margin: '10px', bgcolor: '#9dedb2'
        }}>
            <img src={Logo} alt='GFG logo' width='200px'
                height='200px' />
            <Text>A Computer Science portal for geeks.
                It contains well written, well thought and
                well explained computer science and programming
                articles.
            </Text>
        </Box>
    );
}

export default SimpleExample;
输出:

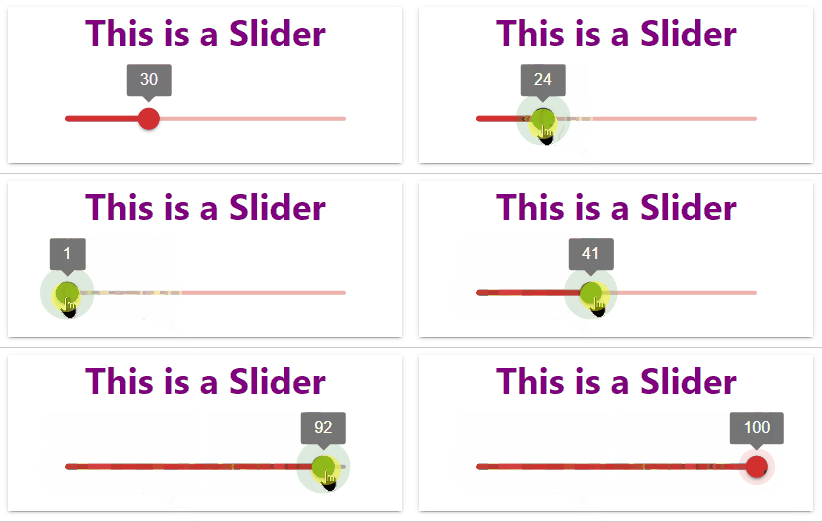
示例2: 下面是使用全局CSS覆盖创建可重用的滑块组件的代码。
- App.js
import * as React from 'react';
import { Slider, Box } from '@mui/material';
import { alpha, styled } from '@mui/material/styles';
import GlobalStyles from '@mui/material/GlobalStyles';

const SuccessSlider = styled(Slider)(({ theme }) => ({
    width: 250,
    color: theme.palette.error.main,
    '& .MuiSlider-thumb': {import * as React from 'react';
import { Slider, Box } from '@mui/material';
import { alpha, styled } from '@mui/material/styles';
import GlobalStyles from '@mui/material/GlobalStyles';

const SuccessSlider = styled(Slider)(({ theme }) => ({
    width: 250,
    color: theme.palette.error.main,
    '& .MuiSlider-thumb': {
        '&:hover, &.Mui-focusVisible': {
            boxShadow:
`0px 0px 0px 8px {alpha(theme.palette.error.main, 0.16)}`,
        },
        '&.Mui-active': {
            boxShadow:
`0px 0px 0px 14px{alpha(theme.palette.success.main, 0.16)}`,
            color: theme.palette.success.main
        },
    },
}));

const Example = () => {
    return (
        <Box sx={{
            boxShadow: 2,
            margin: '50px',
            width: '350px',
            textAlign: 'center'
        }}>
            <GlobalStyles styles={{ h1: { color: 'purple' } }} />
            <h1>This is a Slider</h1>
            <SuccessSlider defaultValue={30}
                valueLabelDisplay='on'
                sx={{ margin: '20px' }} />
        </Box>
    )
}

export default Example;
        '&:hover, &.Mui-focusVisible': {
            boxShadow:
`0px 0px 0px 8px {alpha(theme.palette.error.main, 0.16)}`,
        },
        '&.Mui-active': {
            boxShadow:
`0px 0px 0px 14px{alpha(theme.palette.success.main, 0.16)}`,
            color: theme.palette.success.main
        },
    },
}));

const Example = () => {
    return (
        <Box sx={{ boxShadow: 2,
                   margin: '50px',
                   width: '350px',
                   textAlign: 'center' }}>
            <GlobalStyles styles={{ h1: { color: 'purple' } }} />
            <h1>This is a Slider</h1>
            <SuccessSlider defaultValue={30}
                           valueLabelDisplay='on'
                           sx={{ margin: '20px' }} />
        </Box>
    )
}

export default Example;
输出:

参考资料:https://mui.com/material-ui/customization/how-to-customize/
 极客教程
极客教程