React MUI TypeScript
React MUI TypeScript指的是在React中使用Typescript编写的MUI模块。MUI提供了在React TypeScript中使用的易于使用的UI组件。
先决条件
- NPM和Node.js
- React
- TypeScript
- Material UI
Material-UI 是一个基于Google的Material Design系统的React UI框架,提供了预构建的组件和样式,用于构建现代直观的Web应用程序。它有一个庞大活跃的贡献者社区和一个主题定制系统,方便进行品牌和设计自定义。
所需模块
- react
- node
- @emotion/react
- @emotion/styled
- @material-ui/core
- @mui/icons-material
- @mui/material
创建React应用程序并安装模块的步骤:
步骤1: 使用以下命令创建一个React应用程序。
npx create-react-app react-mui-typescript --template typescript
步骤2: 现在进入项目目录
cd react-mui-typescript
步骤3: 使用以下命令安装依赖项。
npm i @emotion/react @emotion/styled @material-ui/core @mui/icons-material @mui/material
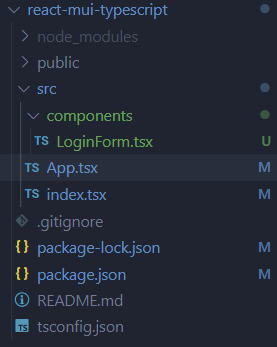
项目结构:

在package.json文件中,更新的依赖项将如下所示。
"dependencies": {
        "@emotion/react": "^11.11.1",
        "@emotion/styled": "^11.11.0",
        "@material-ui/core": "^4.12.4",
        "@mui/icons-material": "^5.14.16",
        "@mui/material": "^5.14.17",
        "@testing-library/jest-dom": "^5.17.0",
        "@testing-library/react": "^13.4.0",
        "@testing-library/user-event": "^13.5.0",
        "@types/jest": "^27.5.2",
        "@types/node": "^16.18.61",
        "@types/react": "^18.2.37",
        "@types/react-dom": "^18.2.15",
        "react": "^18.2.0",
        "react-dom": "^18.2.0",
        "react-scripts": "5.0.1",
        "typescript": "^4.9.5",
        "web-vitals": "^2.1.4"
}
示例 1: 在这里,为了学习在React中使用MUI,我们将演示一个文本字段和onChange事件来改变页面上的值的示例。
// Filename - App.tsx

import React from 'react';

// Import the LoginForm component
import LoginForm from './components/LoginForm';

// Define a function to handle the
// submission of the LoginForm
function handleLogin(
    username: string,
    password: string
) {
    console.log(username, password);
}

// Define the App component
function App() {
    return (
        // Render a div that contains the
        // LoginForm component
        <div>
            {/* Render an H1 element with
            the text "Login Form" */}
            <h1 style={{ textAlign: 'center' }}>
                Login Form
            </h1>
            {/* Render the LoginForm component */}
            <LoginForm onSubmit={handleLogin} />
        </div>
    );
}

// Export the App component
export default App;
Filename – LoginForm.tsx
// Filename - LoginForm.tsx

import React, { useState } from 'react';
import { makeStyles } from '@material-ui/core/styles';
import TextField from '@material-ui/core/TextField';
import Button from '@material-ui/core/Button';

// Define CSS styles using the makeStyles
// function provided by Material-UI
const useStyles = makeStyles({
    form: {
        display: 'flex',
        flexDirection: 'column',
        alignItems: 'center',
    },
    input: {
        marginBottom: '1rem',
    },
    button: {
        marginTop: '1rem',
    },
});

// Define the type for the props passed
// to the LoginForm component
interface LoginFormProps {
    onSubmit: (
        username: string,
        password: string
) => void;
}

// Define the LoginForm component using
// the functional component syntax
export default function LoginForm(props: LoginFormProps) {

    // Use the styles defined earlier
    const classes = useStyles();

    // Define state variables for the
    // username and password input fields
    const [username, setUsername] = useState('');
    const [password, setPassword] = useState('');

    // Define a function to handle form submission
    const handleSubmit =
    (event: React.FormEvent<HTMLFormElement>) => {

        // Prevent the default form submission behavior
        event.preventDefault();

        // Call the onSubmit prop
        props.onSubmit(username, password);
    };

    // Render the login form using Material-UI components
    return (
        <form className={classes.form} onSubmit={handleSubmit}>
            <TextField
                className={classes.input}
                label="Username"
                variant="outlined"
                value={username}

                // Update the value of the username state
                // variable when the input field changes
                onChange={(event) => setUsername(event.target.value)}
            />
            <TextField
                className={classes.input}
                label="Password"
                type="password"
                variant="outlined"
                value={password}
                // Update the value of the password state variable
                // when the input field changes
                onChange={(event) => setPassword(event.target.value)}
            />
            <Button
                className={classes.button}
                variant="contained"
                color="primary"
                type="submit"
            >
                Login
            </Button>
        </form>
    );
}
运行该应用的步骤: 在项目目录下的终端中使用此命令。
npm start
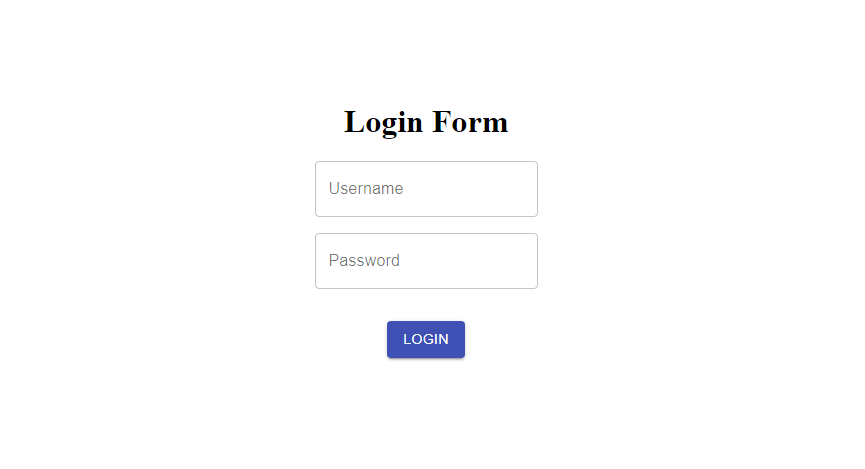
输出: 此输出将可见于 http://localhost:3000/

示例2: 此示例使用TypeScript实现了类似于上面项目的ClickCounter App。
// Filename - App.tsx

import ClickCounter from './components/ClickCounter';

function App() {
    return (
        <ClickCounter />
    );
}

export default App;
Filename – components/ClickCounter.tsx
// Filename - components/ClickCounter.tsx

import React, { useState } from 'react';

// Importing MUI components Button and Typography
import Button from '@mui/material/Button';
import Typography from '@mui/material/Typography';

// Defining a functional component called
// ClickCounter
const ClickCounter: React.FC = () => {

    // Initializing the count state to 0
    // using the useState hook
    const [count, setCount] = useState(0);

    // Defining a function that updates the count
    // state when button is clicked
    const handleButtonClick = () => {
        setCount(count + 1);
    };

    // Return JSX elements that render the
    // click counter UI
    return (
        <>
            <Typography variant="h4" gutterBottom>
                Click Counter
            </Typography>
            <Typography variant="body1" gutterBottom>
                You have clicked the button {count} times.
            </Typography>
            <Button variant="contained"
                onClick={handleButtonClick}>
                Click me!
            </Button>
        </>
    );
};

// Exporting ClickCounter component
export default ClickCounter;
运行应用程序的步骤: 在项目目录中的终端中使用此命令。
npm start
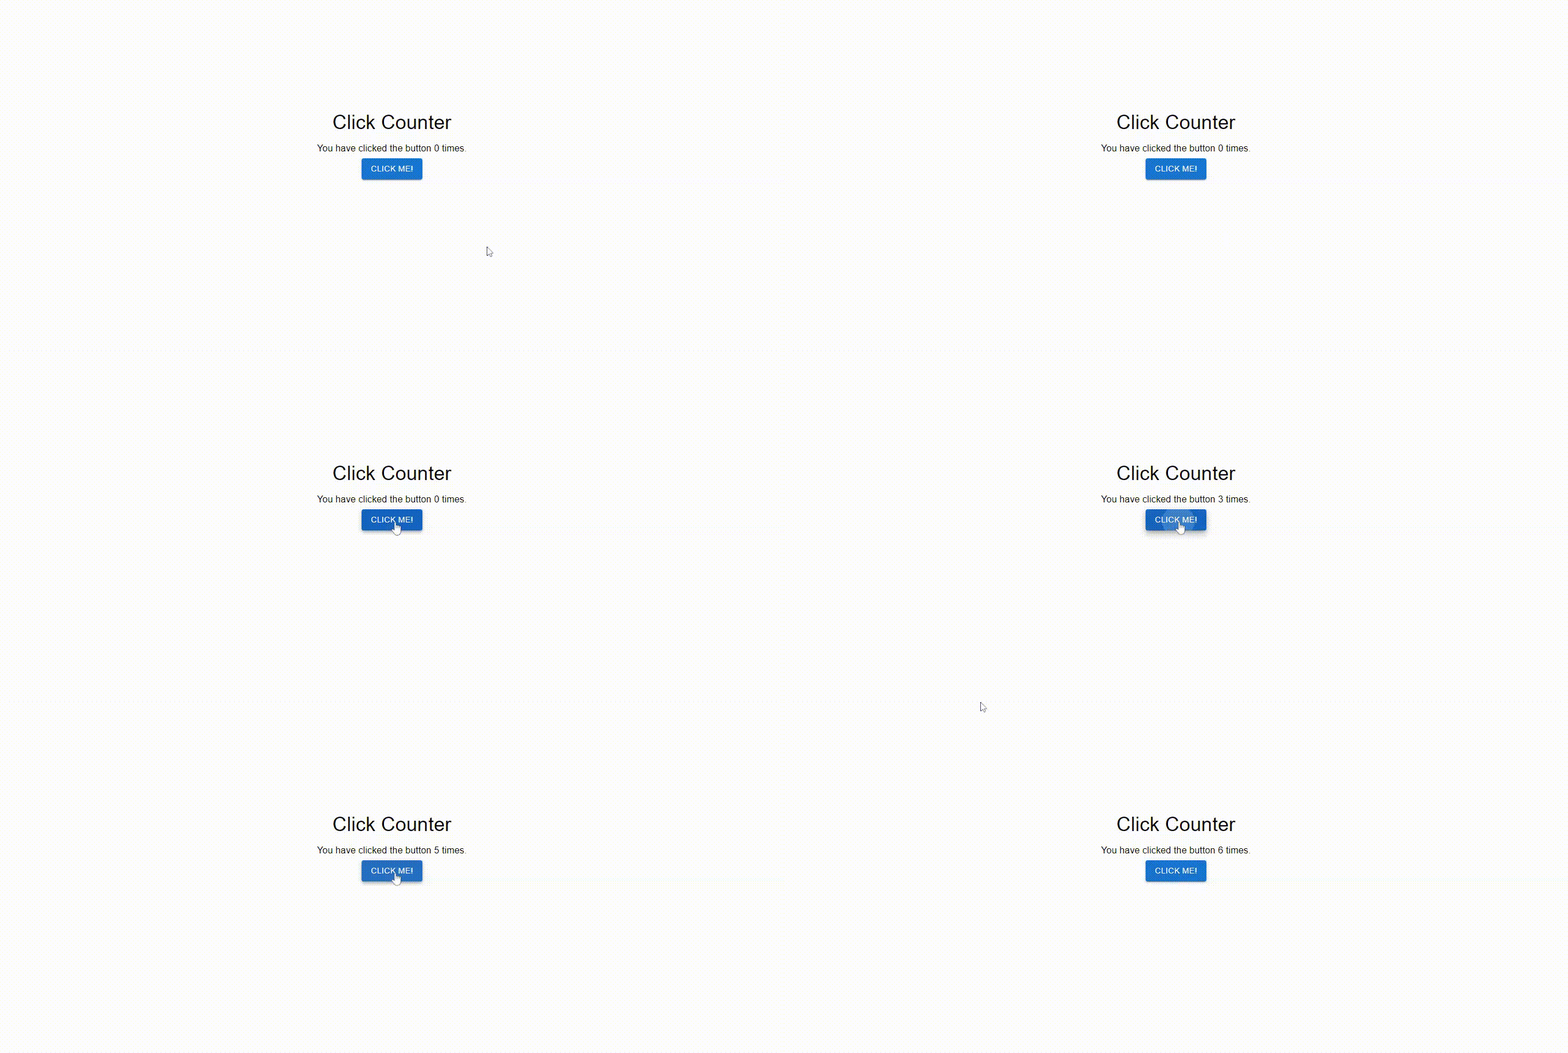
输出: 这个输出结果将可见于 **http://localhost:3000/ **

 极客教程
极客教程