如何在Next.js中复制文本到剪贴板

如何在Next.js中复制文本到剪贴板

本文将探讨如何使用JavaScript在Next.js应用程序中集成文本复制到剪贴板的功能。

在Web开发中,将文本复制到剪贴板的能力具有极大的价值。它使用户能够轻松复制内容并在不同的应用程序或文档之间传输。这种方便的功能简化了信息共享,并通过实现平台之间的无缝数据传输提升了用户体验。

先决条件

  • 介绍Next.js
  • Next.js组件
  • React useState

创建NextJS应用程序的步骤

步骤1: 使用以下命令创建一个Next.js项目:

npx create-next-app my-clipboard-app

NPX这个词是Node Package Execute的缩写,作为一个方便的NPM套件运行程序。它允许开发者无需安装即可轻松执行来自NPM注册表的任何Javascript套件。NPX会自动与NPM版本5.2.0及以上一同安装。

步骤2: 切换到目录:

cd my-clipboard-app

项目结构:
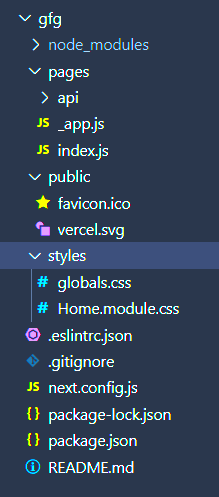
如何在Next.js中复制文本到剪贴板

方法

使用useState钩子在组件中有效地管理状态。它跟踪两个重要的元素:用户输入的文本(稍后将被复制)和一个布尔值,指示复制过程是否成功。handleCopyText函数通过更新copyText状态来执行关键任务,更新文本为用户提供的文本。类似地,copyToClipboard函数允许将存储在copyText中的值轻松复制到剪贴板。它通过利用document.execCommand('copy')方法来实现。

示例: 在这个示例中,我们将把文本复制到剪贴板中:Next.js

  • index.js文件
import React, { useState } from 'react'; 
  
const App = () => { 
    const [userInput, setUserInput] = useState(''); 
    const [list, setList] = useState([]); 
  
    // Set a user input value 
    const updateInput = (value) => { 
        setUserInput(value); 
    }; 
  
    // Add item if user input is not empty 
    const addItem = () => { 
        if (userInput !== '') { 
            const userInputItem = { 
                // Add a random id which is used to delete 
                id: Math.random(), 
  
                // Add a user value to list 
                value: userInput, 
            }; 
  
            // Update list 
            setList([...list, userInputItem]); 
  
            // Reset state 
            setUserInput(''); 
        } 
    }; 
  
    // Function to delete item from list using id to delete 
    const deleteItem = (key) => { 
        const updatedList = 
            list.filter((item) => item.id !== key); 
        setList(updatedList); 
    }; 
  
    const editItem = (index) => { 
        const editedTodo = prompt('Edit the todo:'); 
        if (editedTodo !== null && editedTodo.trim() !== '') { 
            const updatedTodos = [...list]; 
            updatedTodos[index].value = editedTodo; 
            setList(updatedTodos); 
        } 
    }; 
  
    return ( 
        <div 
            style={{ 
                fontFamily: 'Arial, sans-serif', 
                maxWidth: '600px', 
                margin: '0 auto', 
                padding: '20px', 
            }} 
        > 
            <div 
                style={{ 
                    textAlign: 'center', 
                    fontSize: '2.5rem', 
                    fontWeight: 'bold', 
                    marginBottom: '20px', 
                    color: 'green', 
                }} 
            > 
                Geeksforgeeks 
            </div> 
            <div 
                style={{ 
                    textAlign: 'center', 
                    fontSize: '1.5rem', 
                    fontWeight: 'bold', 
                    marginBottom: '20px', 
                }} 
            > 
                TODO LIST 
            </div> 
            <div 
                style={{ 
                    display: 'flex', 
                    alignItems: 'center', 
                    marginBottom: '20px'
                }} 
            > 
                <input 
                    style={{ 
                        fontSize: '1.2rem', 
                        padding: '10px', 
                        marginRight: '10px', 
                        flexGrow: '1', 
                        borderRadius: '4px', 
                        border: '1px solid #ccc', 
                    }} 
                    placeholder="Add item..."
                    value={userInput} 
                    onChange={(item) => 
                        updateInput(item.target.value)} 
                /> 
                <button 
                    style={{ 
                        fontSize: '1.2rem', 
                        padding: '10px 20px', 
                        backgroundColor: '#4caf50', 
                        color: 'white', 
                        border: 'none', 
                        borderRadius: '8px', 
                        cursor: 'pointer', 
                    }} 
                    onClick={addItem} 
                > 
                    ADD 
                </button> 
            </div> 
            <div 
                style={{ 
                    background: '#f9f9f9', 
                    padding: '20px', 
                    borderRadius: '8px'
                }} 
            > 
                {list.length > 0 ? ( 
                    list.map((item, index) => ( 
                        <div 
                            key={index} 
                            style={{ 
                                display: 'flex', 
                                justifyContent: 'space-between', 
                                alignItems: 'center', 
                                marginBottom: '10px', 
                            }} 
                        > 
                            <span style={{ 
                                fontSize: '1.2rem', 
                                flexGrow: '1'
                            }}> 
                                {item.value} 
                            </span> 
                            <span> 
                                <button 
                                    style={{ 
                                        padding: '10px', 
                                        backgroundColor: '#f44336', 
                                        color: 'white', 
                                        border: 'none', 
                                        borderRadius: '8px', 
                                        marginRight: '10px', 
                                        cursor: 'pointer', 
                                    }} 
                                    onClick={() => deleteItem(item.id)} 
                                > 
                                    Delete 
                                </button> 
                                <button 
                                    style={{ 
                                        padding: '10px', 
                                        backgroundColor: '#2196f3', 
                                        color: 'white', 
                                        border: 'none', 
                                        borderRadius: '8px', 
                                        cursor: 'pointer', 
                                    }} 
                                    onClick={() => editItem(index)} 
                                > 
                                    Edit 
                                </button> 
                            </span> 
                        </div> 
                    )) 
                ) : ( 
                    <div 
                        style={{ 
                            textAlign: 'center', 
                            fontSize: '1.2rem', 
                            color: '#777'
                        }} 
                    > 
                        No items in the list 
                    </div> 
                )} 
            </div> 
        </div> 
    ); 
}; 
  
export default App;

步骤4: 要运行next.js应用程序,请执行下面的命令,然后在浏览器中访问http://localhost:3000。

npm run dev  

输出 :
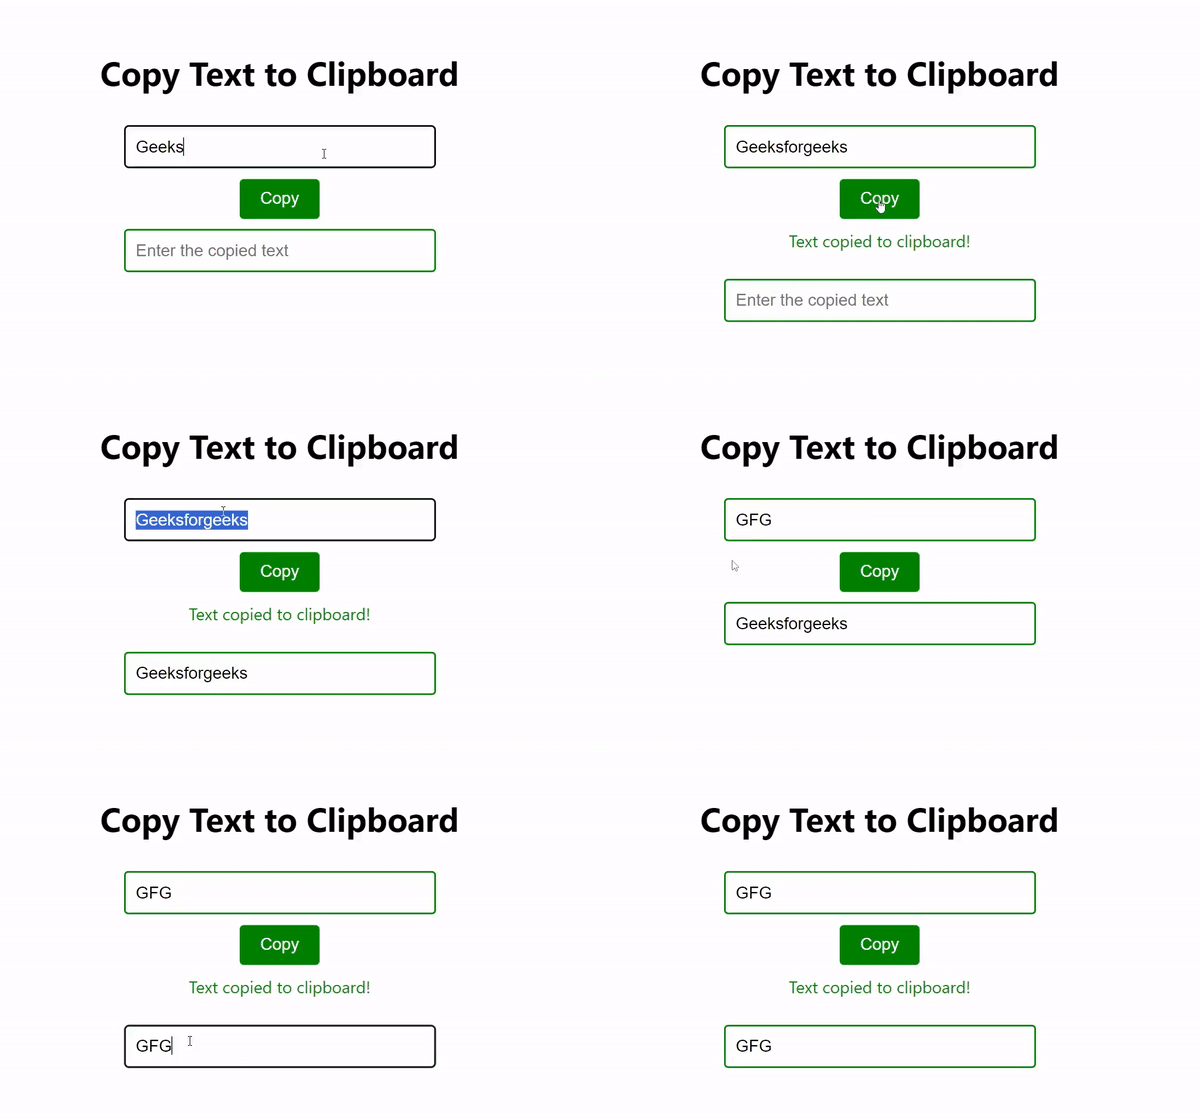
如何在Next.js中复制文本到剪贴板

Python教程

Java教程

Web教程

数据库教程

图形图像教程

大数据教程

开发工具教程

计算机教程