使用ReactJS构建一个具有无限滚动的图像搜索应用程序
在本文中,我们将探讨如何使用React创建一个具有无限滚动的图像搜索应用程序。该应用程序将允许用户根据给定的查询搜索图像,并在滚动时获取和显示更多的图像。我们将使用Unsplash API来搜索和获取图像。通过本教程的最后,您将获得一个具有无限滚动功能的功能性图像搜索应用程序。
让我们来看看最终应用程序的样子:

先决条件
- ReactJS
- CSS
- JSX
方法
我们将使用Unsplash API根据用户的搜索查询来获取图像。我们将包括一个防抖动的搜索输入框,以延迟API请求到用户暂停输入。当用户滚动到页面底部时,我们还将实现无限滚动以获取更多图像。在获取图像时会显示一个预加载的旋转器。使用useState,useEffect和useRef钩子将帮助我们管理状态和执行必要的操作。
创建React应用的步骤
步骤1: 使用以下命令创建项目文件:
npx create-react-app <<Name_of_project>>
步骤2: 使用命令导航到该文件夹
cd <<Name_of_project>>
步骤3: 安装以下软件包
npm install unsplash-js lodash react-spinners
模块:
- unsplash-js: 与Unsplash交互的 **** API。
- lodash: 使用防抖功能的工具函数。
- react-spinners: 在获取图片时显示加载动画。
package.json中更新的依赖项将如下所示:
"dependencies": {
    "@testing-library/jest-dom": "^5.16.5",
    "@testing-library/react": "^13.4.0",
    "@testing-library/user-event": "^13.5.0",
    "lodash": "^4.17.21",
    "react": "^18.2.0",
    "react-dom": "^18.2.0",
    "react-scripts": "5.0.1",
    "react-spinners": "^0.13.8",
    "unsplash-js": "^7.0.18",
    "web-vitals": "^2.1.4"
}
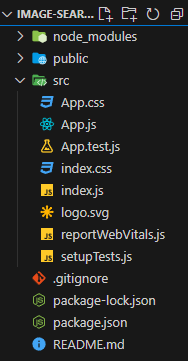
项目结构
它将会如下所示。

注意: 从https://unsplash.com/获取你的Unsplash API密钥。
示例: 在相应文件中编写以下代码。
- App.js :这个文件包含了主要的逻辑。
- App.css :这个文件包含了样式。
// App.js
import "./App.css";
import { useState, useEffect, useRef } from "react";
import { createApi } from "unsplash-js";
import { debounce } from "lodash";
import { BounceLoader } from "react-spinners";

const unsplash = createApi({
    accessKey: << use your API Key>>,
});

function App() {

    // State variable to store the search phrase
    const [phrase, setPhrase] = useState("");

    // Ref to hold the current value of the search phrase
    const phraseRef = useRef(phrase);

    // State variable to store the fetched images
    const [images, setImages] = useState([]);

    // Ref to hold the current value of the fetched images
    const imagesRef = useRef(images);

    // State variable to indicate if images are being fetched
    const [fetching, setFetching] = useState(false);

    // Ref to hold the current value of the fetching state
    const fetchingRef = useRef(fetching);

    function getUnsplashImages(query, page = 1) {
        setFetching(true);
        fetchingRef.current = true;
        return new Promise((resolve, reject) => {
            unsplash.search
                .getPhotos({
                    query,
                    page,
                    perPage: 5,
                })
                .then((result) => {

                    // Update fetching state to indicate
                    //that images fetching is completed
                    setFetching(false);
                    fetchingRef.current = false;
                    resolve(result.response.results.map((result) =>
                        result.urls.regular));
                });
        });
    }

    useEffect(() => {
        phraseRef.current = phrase;
        if (phrase !== "")
            debounce(() => {
                setImages([]);
                getUnsplashImages(phrase, 1).then((images) => {
                    setImages(images);
                });
                imagesRef.current = images;
            }, 1000)();
    }, [phrase]);

    function handleScroll(e) {
        const { scrollHeight, scrollTop, clientHeight } =
            e.target.scrollingElement;
        const isBottom = scrollHeight - scrollTop <= clientHeight;
        if (isBottom && !fetchingRef.current) {
            getUnsplashImages(
                phraseRef.current,
                imagesRef.current.length / 5 + 1
            ).then((newImages) => {
                imagesRef.current = [...imagesRef.current, ...newImages];
                setImages(imagesRef.current);
            });
        }
    }
    useEffect(() => {
        document.addEventListener("scroll", handleScroll, { passive: true });
        return () =>
            document.removeEventListener("scroll", handleScroll);
    }, []);

    return (
        <div>
            <input
                type="text"
                value={phrase}
                onChange={(e) => setPhrase(e.target.value)}
            />
            <br />
            {images.length > 0 && images.map((url) =>
                <img src={url} />)}
            <div>
                {fetching && (
                    <div style={{ textAlign: "center" }}>
                        <BounceLoader speedMultiplier={5}
                            color="#000000" />
                    </div>
                )}
            </div>
        </div>
    );
}

export default App;
CSS
/* App.css  */
img {
  max-width: 100%;
}
运行应用程序的步骤
步骤1: 在您的项目目录的终端中输入以下命令
npm start
步骤2: 在您的网页浏览器中输入以下 URL。
http://localhost:3000/
输出:

 极客教程
极客教程