Node.js 如何使用JSON Web Tokens
JSON Web Token (JWT)是一种安全交换数据的互联网标准。它很难被破解,因为它使用密钥和HMAC算法创建数字签名。
JWT结构: JSON Web Tokens由三部分组成,以点分隔(xxxxx.yyyyy.zzzzz),分别是:
- 头部: 包含令牌类型(此处为JWT)和使用的算法。
- 负载: 包含创建令牌时使用的负载数据。
- 签名: 使用头部、负载和密钥以及在头部中指定的算法创建的数字签名。
与Node.js整合:
步骤1: 首先,使用以下命令初始化一个简单的node应用程序,并添加express、dotenv包。
npm init -y
npm i express dotenv
步骤2: 接着,使用下面的命令安装JWT
npm i jsonwebtoken
示例: 让我们使用一个简单的用户认证应用程序来说明JWT的使用。
将以下内容复制到index.js文件中。为了说明的目的,假设我们有一个用户“admin”,密码为“admin”。
我们的目标是使用JWT保护“/home”端点,只有经过身份验证的用户才能访问。
const express = require("express");
const app = express();

app.use(express.json());

app.post("/login", (req, res) => {
    console.log("Login router");
    res.json({ msg: "Login Endpoint" });
});

app.get("/home", (req, res) => {
    console.log(
"Protected endpoint that only authorized users can access");
    res.json({ msg: "Home Endpoint" });
});

app.listen(8000, () => console.log("Listening on 8000"));
首先,我们将使用JWT对令牌进行签名,并在成功登录后将其发送回给用户。然后,在每个后续请求中,用户将通过请求头发送JWT令牌。
创建一个 .env 文件,其内容如下:
JWT_SECRET_KEY=<your_secret_key>
替换为您的秘钥。这个秘钥被JWT用来对令牌进行数字签名。这不应该在代码库中暴露,因为这可能导致安全问题。在使用实时应用程序时,应该安全保存。
现在,让我们修改index.js文件中的登录端点如下所示:
// Add these two lines at the top of the file
require("dotenv").config();
const jwt = require("jsonwebtoken");

// Modify the login route as below
app.post("/login", (req, res) => {
    const { username, password } = req.body;
    if (username === "admin" && password === "admin") {
        const token = jwt.sign({ username },
        process.env.JWT_SECRET_KEY, {
            expiresIn: 86400
        });
        return res.json({ username, token, msg: "Login Success" });
    }
    return res.json({ msg: "Invalid Credentials" });
});
在用户成功登录时,我们使用JWT将令牌与用户名作为有效负载进行签名,它将在86400秒(24小时)后过期。
运行应用程序的步骤: 现在使用以下命令启动应用程序:
node index.js
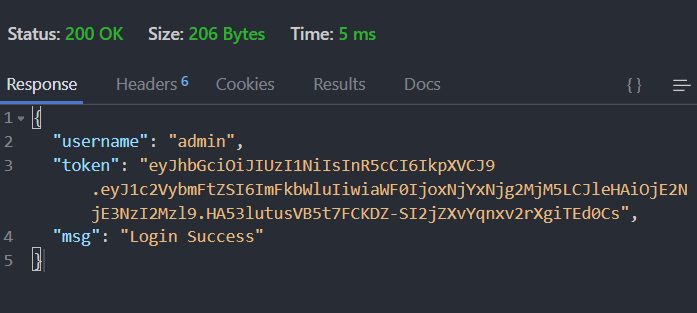
开启你选择的任意REST客户端(Postman / Insomnia / Thunder Client等),并向登录终端发出 POST 请求,请求体如下。

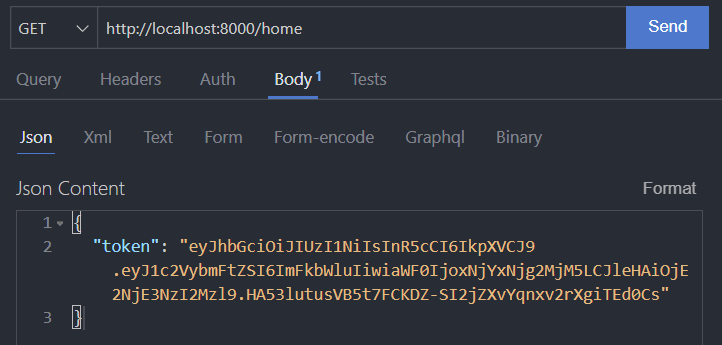
现在复制令牌并保存起来,以备后面对首页端点的下一次请求使用。现在登录端点已经完成,让我们继续进行首页端点的操作。
现在按照以下方式编辑index.js文件:
/* This middleware function is used to verify
the token before granting access to the user
to the protected endpoints. If the token is
invalid it will restrict the user from
accessing the protected endpoints
We can use this middleware to any endpoints
that we desire to make as protected*/

const verifyTokenMiddleware = (req, res, next) => {
    const { token } = req.body;
    if (!token) return res.status(403).json({
        msg: "No token present"
    });
    try {
        const decoded = jwt.verify(token,
            process.env.JWT_SECRET_KEY);
        req.user = decoded;
    } catch (err) {
        return res.status(401).json({
            msg: "Invalid Token"
        });
    }
    next();
};

// Modify the home endpoint as below
// to use the verifyTokenMiddleware
app.get("/home", verifyTokenMiddleware, (req, res) => {
    const { user } = req;
    res.json({ msg: `Welcome ${user.username}` });
});
在这里,我们创建了一个verifyToken中间件,用于验证令牌的有效性和完整性,只有在令牌有效时用户才能访问主页端点。
打开REST客户端,并尝试在没有任何令牌的情况下访问主页端点。

当我们运行这个时,会得到以下错误。

现在,在请求头中粘贴在登录步骤中复制的令牌,并尝试访问主页终点。

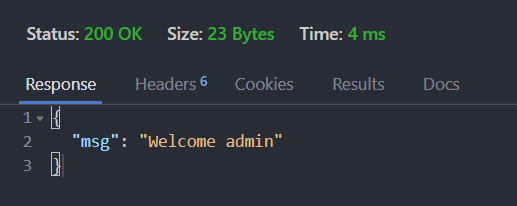
当我们运行这个程序时,我们将得到以下的成功响应。

成功! 提供正确的令牌后,我们可以访问主页端点。通过这种方式,我们可以使用jwt来保护我们的Node.js应用程序。
 极客教程
极客教程