用Keras实现CNN,一个初学者友好的指南,用python基于Keras实现一个简单的卷积神经网络(CNN)。

Keras是一个简单易用但功能强大的Python深度学习库。在这篇文章中,我们将构建一个简单的卷积神经网络(CNN),并训练它来解决Keras的一个实际问题。
这篇文章是为完整的Keras初学者准备的,但它假设了CNNs的基本背景知识。我对卷积神经网络的介绍涵盖了你在这篇文章中需要知道的一切(甚至更多)——如果有必要的话,请先读一读。
问题:MNIST数字分类
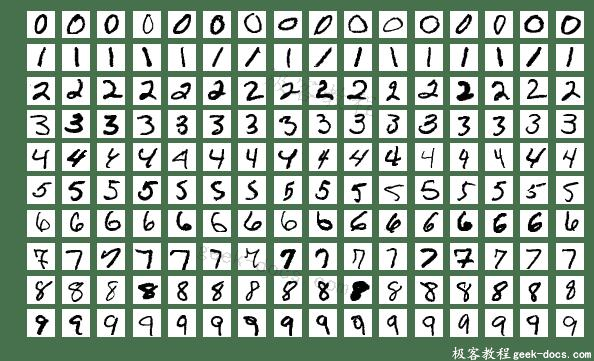
我们将解决一个经典的计算机视觉入门问题:MNIST手写数字分类。很简单:给定一个图像,将它分类为一个数字。

来自MNIST数据集的示例图像
MNIST数据集中的每个图像都是28×28,并包含一个以居中的灰度数字。我们的CNN将获取一个图像并输出10个可能的类中的一个(每个数字对应一个类)。
Setup
我假设您已经安装了基本的Python(您可能已经安装了)。让我们先下载一些我们需要的软件包:
$ pip install keras tensorflow numpy mnist
注意:我们需要安装tensorflow,因为我们将在tensorflow后端运行Keras。
现在,您应该能够导入这些包:
import numpy as np
import mnist
import keras

# The first time you run this might be a bit slow, since the
# mnist package has to download and cache the data.
train_images = mnist.train_images()
train_labels = mnist.train_labels()

print(train_images.shape) # (60000, 28, 28)
print(train_labels.shape) # (60000,)
准备数据
在开始之前,我们将图像像素值从[0,255]规格化到[-0.5,0.5],以使我们的网络更容易训练(使用较小的居中值通常会得到更好的结果)。我们还将把每个图像从(28,28)重新塑造为(28,28,1),因为Keras需要第三维。
import numpy as np
import mnist

train_images = mnist.train_images()
train_labels = mnist.train_labels()
test_images = mnist.test_images()
test_labels = mnist.test_labels()

# Normalize the images.
train_images = (train_images / 255) - 0.5
test_images = (test_images / 255) - 0.5

# Reshape the images.
train_images = np.expand_dims(train_images, axis=3)
test_images = np.expand_dims(test_images, axis=3)

print(train_images.shape) # (60000, 28, 28, 1)
print(test_images.shape)  # (10000, 28, 28, 1)
我们准备好开始建设我们的CNN了!
建立模型
每个Keras模型要么使用Sequential(序列)类(它表示层的线性堆栈)构建,要么使用函数模型类(它更具可定制性)构建。我们将使用更简单的序列模型,因为我们的CNN将是一个线性层堆栈。
我们首先实例化一个序列模型:
from keras.models import Sequential

# WIP
model = Sequential([
  # layers...
])
Sequential构造函数接受Keras层数组。我们将为CNN使用三种类型的层:卷积、最大池化(max pooling)和Softmax。
from keras.layers import Conv2D, MaxPooling2D, Dense, Flatten

num_filters = 8
filter_size = 3
pool_size = 2

model = Sequential([
  Conv2D(num_filters, filter_size, input_shape=(28, 28, 1)),
  MaxPooling2D(pool_size=pool_size),
  Flatten(),
  Dense(10, activation='softmax'),
])
- num_filters、filter_size和pool_size是为CNN设置超参数的自解释变量。
- 任何序列模型的第一层都必须指定input_shape,所以我们在Conv2D上这样做。一旦指定了这个输入形状,Keras将自动推断后面层的输入形状。
- 输出Softmax层有10个节点,每个类一个。
编译模型
在开始培训之前,我们需要配置训练流程。在编译过程中,我们确定了3个关键因素:
- 优化器。我们将坚持使用一个非常好的默认值:基于Adam gradient的优化器。Keras还有许多其他的优化器,您也可以查看。
- 损失函数。由于我们使用的是Softmax输出层,我们将使用交叉熵损失。Keras区分了binary_crossentropy(2类)和categorical_crossentropy(>2类),所以我们将使用后者。
- 度量标准列表。由于这是一个分类问题,我们只需要Keras报告精度指标。
编译如下:
model.compile(
  'adam',
  loss='categorical_crossentropy',
  metrics=['accuracy'],
)
训练模型
在Keras中训练模型实际上只需要调用fit()和指定一些参数。有很多可能的参数,但我们只提供这些:
- 训练数据(图像和标签),通常分别称为X和Y。
- 要训练的轮数(整个数据集上的迭代)。
- 训练时使用的批大小(每次梯度更新的样本数量)。
代码看起来是这样的:
model.fit(
  train_images, # training data
  train_labels, # training targets
  epochs=5,
  batch_size=32,
)
然而,这实际上还没有起作用——我们忽略了一件事。Keras期望训练目标是10维向量,因为我们的Softmax输出层中有10个节点,但是我们为每个图像提供一个表示类的整数。
方便的是,Keras有一个实用程序方法来解决这个问题:to_categorical。它将我们的类整数数组转换成一个只有一个热向量的数组。例如,2将变成[0,0,1,0,0,0,0,0,0,0]。
我们现在可以把所有的东西放在一起来训练我们的网络:
import numpy as np
import mnist
from keras.models import Sequential
from keras.layers import Dense
from keras.utils import to_categorical

train_images = mnist.train_images()
train_labels = mnist.train_labels()
test_images = mnist.test_images()
test_labels = mnist.test_labels()

# Normalize the images.
train_images = (train_images / 255) - 0.5
test_images = (test_images / 255) - 0.5

# Flatten the images.
train_images = train_images.reshape((-1, 784))
test_images = test_images.reshape((-1, 784))

# Build the model.
model = Sequential([
  Dense(64, activation='relu', input_shape=(784,)),
  Dense(64, activation='relu'),
  Dense(10, activation='softmax'),
])

# Compile the model.
model.compile(
  optimizer='adam',
  loss='categorical_crossentropy',
  metrics=['accuracy'],
)

# Train the model.
model.fit(
  train_images,
  to_categorical(train_labels),
  epochs=5,
  batch_size=32,
)
运行这段代码会得到如下结果:
Epoch 1/5
60000/60000 [==============================] - 2s 35us/step - loss: 0.3772 - acc: 0.8859
Epoch 2/5
60000/60000 [==============================] - 2s 31us/step - loss: 0.1928 - acc: 0.9421
Epoch 3/5
60000/60000 [==============================] - 2s 31us/step - loss: 0.1469 - acc: 0.9536
Epoch 4/5
60000/60000 [==============================] - 2s 31us/step - loss: 0.1251 - acc: 0.9605
Epoch 5/5
60000/60000 [==============================] - 2s 31us/step - loss: 0.1079 - acc: 0.9663
经过5轮,我们的训练准确率达到了96.6% !然而,这并不能告诉我们太多——我们可能是过拟合了。真正的挑战将是看我们的模型如何在测试数据上执行。
测试模型
评估模型非常简单:
model.evaluate(
  test_images,
  to_categorical(test_labels)
)
运行得到:
10000/10000 [==============================] - 0s 15us/step
[0.10821614159140736, 0.965]
evaluate()返回一个数组,其中包含测试损失和我们指定的任何指标。因此,我们的模型达到了0.108的测试损耗和96.5%的测试精度!对你的第一个神经网络来说还不错。
使用模型
现在我们有了一个有效的、训练有素的模型,让我们来使用它。我们要做的第一件事是把它保存到磁盘上,这样我们就可以随时把它加载回去:
model.save_weights('model.h5')
不论何时我们想要重建,我们都可以重新加载训练后的模型,并加载被保存的权重:
from keras.models import Sequential
from keras.layers import Dense

# Build the model.
model = Sequential([
  Dense(64, activation='relu', input_shape=(784,)),
  Dense(64, activation='relu'),
  Dense(10, activation='softmax'),
])

# Load the model's saved weights.
model.load_weights('model.h5')
使用经过训练的模型进行预测很容易:我们传递一个输入数组来predict(),它返回一个输出数组。请记住,我们的网络的输出是10个概率(因为softmax),所以我们将使用np.argmax()将这些概率转换为实际的数字。
# Predict on the first 5 test images.
predictions = model.predict(test_images[:5])

# Print our model's predictions.
print(np.argmax(predictions, axis=1)) # [7, 2, 1, 0, 4]

# Check our predictions against the ground truths.
print(test_labels[:5]) # [7, 2, 1, 0, 4]
扩展
到目前为止,我们所讨论的只是一个简单的介绍—我们还可以做更多的实验来改进这个网络。我在下面列举了几个例子:
调优Hyperparameters
一个好的超参数是Adam优化器的学习率。当你增加或减少它时会发生什么?
from keras.optimizers import SGD

model.compile(
  optimizer=Adam(lr=0.005),
  loss='categorical_crossentropy',
  metrics=['accuracy'],
)
那么批次大小和轮数呢?
model.fit(
  train_images,
  to_categorical(train_labels),
  epochs=10,
  batch_size=64,
)
网络深度
如果我们删除或添加更多的全连接层会发生什么?这如何影响训练和/或模型的最终性能?
model = Sequential([
  Dense(64, activation='relu', input_shape=(784,)),
  Dense(64, activation='relu'),
  Dense(64, activation='relu'),
  Dense(64, activation='relu'),
  Dense(10, activation='softmax'),
])
激活
如果我们使用除ReLU以外的激活,例如sigmoid,会怎么样?
model = Sequential([
  Dense(64, activation='sigmoid', input_shape=(784,)),
  Dense(64, activation='sigmoid'),
  Dense(10, activation='softmax'),
])
Dropout
如果我们尝试添加Dropout层,这是已知的防止过拟合?
from keras.layers import Dense, Dropout

model = Sequential([
  Dense(64, activation='relu', input_shape=(784,)),
  Dropout(0.5),
  Dense(64, activation='relu'),
  Dropout(0.5),
  Dense(10, activation='softmax'),
])
验证
我们还可以在训练期间使用测试数据集进行验证。Keras将在每个epoch结束时在验证集上评估模型,并报告损失和我们要求的任何度量。这允许我们在训练期间监视模型的进展,这对于识别过拟合甚至支持早期停止都是有用的。
model.fit(
  train_images,
  to_categorical(train_labels),
  epochs=5,
  batch_size=32,
  validation_data=(test_images, to_categorical(test_labels))
)
结论
您已经用Keras实现了您的第一个神经网络!经过5个epoch,我们对MNIST数据集的测试精度达到了96.5%,这对于这样一个简单的网络来说是不错的。我将在本文末尾再次包含完整的源代码供您参考。
如果你想学习更先进的技术来接近MNIST,我建议你看看我对卷积神经网络(CNNs)的介绍。在这篇文章中,我们看到了如何使用更复杂的网络在MNIST上实现更高的准确率(>99%)。我还推荐使用Keras实现CNN的指南,类似于本文。
你可能感兴趣的进一步阅读包括:
感谢阅读本文!完整的源代码如下。
# The full neural network code!
###############################
import numpy as np
import mnist
from keras.models import Sequential
from keras.layers import Dense
from keras.utils import to_categorical

train_images = mnist.train_images()
train_labels = mnist.train_labels()
test_images = mnist.test_images()
test_labels = mnist.test_labels()

# Normalize the images.
train_images = (train_images / 255) - 0.5
test_images = (test_images / 255) - 0.5

# Flatten the images.
train_images = train_images.reshape((-1, 784))
test_images = test_images.reshape((-1, 784))

# Build the model.
model = Sequential([
  Dense(64, activation='relu', input_shape=(784,)),
  Dense(64, activation='relu'),
  Dense(10, activation='softmax'),
])

# Compile the model.
model.compile(
  optimizer='adam',
  loss='categorical_crossentropy',
  metrics=['accuracy'],
)

# Train the model.
model.fit(
  train_images,
  to_categorical(train_labels),
  epochs=5,
  batch_size=32,
)

# Evaluate the model.
model.evaluate(
  test_images,
  to_categorical(test_labels)
)

# Save the model to disk.
model.save_weights('model.h5')

# Load the model from disk later using:
# model.load_weights('model.h5')

# Predict on the first 5 test images.
predictions = model.predict(test_images[:5])

# Print our model's predictions.
print(np.argmax(predictions, axis=1)) # [7, 2, 1, 0, 4]

# Check our predictions against the ground truths.
print(test_labels[:5]) # [7, 2, 1, 0, 4]
 极客教程
极客教程