在本教程中,我们使用 Stripes,MyBatis 和 Derby 创建一个 Java Web 应用。 我们使用 NetBeans 来构建应用。 Apache Tomcat 用作 JSP 和 servlet 容器。 可从作者的 Github 存储库中获得项目源。
Stripes 是一个开源的轻量级 Java Web 应用框架。 Stripes 的目标是使 Java 中基于 Servlet / JSP 的 Web 开发变得简单,直观和直接。 Stripes 是基于动作的 MVC(模型视图控制器)框架。 它运行在 JEE Web 容器中,使用最少的配置文件,并具有灵活和简单的参数绑定。
MyBatis 是 Java 持久性框架,使用 XML 描述符或注释将对象与存储过程或 SQL 语句耦合。 与 ORM 框架不同,MyBatis 不会将 Java 对象映射到数据库表,而是将 Java 方法映射到 SQL 语句。 MyBatis 允许使用所有数据库功能,例如存储过程,视图,任何复杂性和供应商专有功能的查询。
Derby 是用 Java 编写的关系数据库管理系统。 Oracle 以 Java DB 的名义分发相同的二进制文件。 Derby 的占用空间很小,约为 2MB。 Derby 使用的数据库格式是可移植的且与平台无关。
图书应用
我们在 NetBeans 中创建一个新的 Web 应用。 在应用中,我们将能够将新书添加到数据库中,通过它们的 ID 选择单个书,然后选择表中的所有书。 该项目需要 Stripes,MyBatis 和 JSTL 库。 前三个 JAR 是 MyBatis 库,后三个是 Stripes 的库。 我们必须从他们的项目页面中删除他们。 JSTL JAR 随 NebBeans 一起提供。
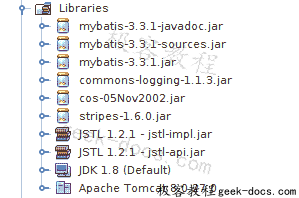
Figure: Project libraries
在“ NetBeans 服务”选项卡中,我们展开“数据库”节点,然后右键单击 Java DB 节点,然后选择“创建数据库”选项。 数据库名称将为books,用户名和密码为app和app。
books.sql
CREATE TABLE Books(Id INTEGER NOT NULL PRIMARY KEY GENERATED ALWAYS AS IDENTITY
    (START WITH 1, INCREMENT BY 1), Author VARCHAR(30), Title VARCHAR(60),
    Published INTEGER, Remark VARCHAR(150));
INSERT INTO Books(Author, Title, Published, Remark) VALUES ('Leo Tolstoy', 'War and Peace', 1869, 'Napoleonic wars');
INSERT INTO Books(Author, Title, Published, Remark) VALUES ('Leo Tolstoy', 'Anna Karenina', 1878, 'Greatest book of love');
INSERT INTO Books(Author, Title, Published, Remark) VALUES ('Jeff Prosise', 'Programming Windows with MFC', 1999, 'Classic book about MFC');
INSERT INTO Books(Author, Title, Published, Remark) VALUES ('Tom Marrs', 'JBoss at Work', 2005, 'JBoss practical guide');
INSERT INTO Books(Author, Title, Published, Remark) VALUES ('Debu Panda', 'EJB3 in Action', 2007, 'Introduction to Enterprice Java Beans');
我们创建一个与创建的数据库的新数据库连接,并执行此 SQL 代码。 我们有一个Books表,其中包含几本书。
web.xml
<?xml version="1.0" encoding="UTF-8"?>

<web-app xmlns="http://xmlns.jcp.org/xml/ns/javaee"
         xmlns:xsi="http://www.w3.org/2001/XMLSchema-instance"
         xsi:schemaLocation="http://xmlns.jcp.org/xml/ns/javaee http://xmlns.jcp.org/xml/ns/javaee/web-app_3_1.xsd"
         version="3.1">

    <filter>
        <display-name>Stripes Filter</display-name>
        <filter-name>StripesFilter</filter-name>
        <filter-class>net.sourceforge.stripes.controller.StripesFilter</filter-class>
        <init-param>
            <param-name>ActionResolver.Packages</param-name>
            <param-value>com.zetcode.action</param-value>
        </init-param>
    </filter>

    <filter-mapping>
        <filter-name>StripesFilter</filter-name>
        <url-pattern>*.jsp</url-pattern>
        <dispatcher>REQUEST</dispatcher>
    </filter-mapping>

    <filter-mapping>
        <filter-name>StripesFilter</filter-name>
        <servlet-name>StripesDispatcher</servlet-name>
        <dispatcher>REQUEST</dispatcher>
    </filter-mapping>

    <servlet>
        <servlet-name>StripesDispatcher</servlet-name>
        <servlet-class>net.sourceforge.stripes.controller.DispatcherServlet</servlet-class>
        <load-on-startup>1</load-on-startup>
    </servlet>

    <servlet-mapping>
        <servlet-name>StripesDispatcher</servlet-name>
        <url-pattern>*.action</url-pattern>
    </servlet-mapping>

    <welcome-file-list>
        <welcome-file>index.jsp</welcome-file>
    </welcome-file-list>

</web-app>
在web.xml部署描述符中,我们设置了 Stripes 框架。 index.jsp文件是默认的主页文件。 在com.zetcode.action中,有ActionBeans。
resources
在resources目录中,我们有三个文件。 通过右键单击项目文件并选择“属性”来创建resources目录。 在源类别中,我们添加一个新的源包文件夹。

Figure: Resources
BookMapper.xml和mybatis-config.xml是 MyBatis 使用的 XML 文件。 StripesResources.properties是 Stripes 框架的默认资源束文件。 它包含应用的错误消息和标签。 它位于 Stripes 下载文件的lib子目录中。
表示层
表示层由六个 JSP 页面组成。 index.jsp是应用的默认主页。 addBook.jsp是用于向数据库添加新书的页面,findBook.jsp是用于通过其 ID 查找书的页面。 将书籍成功插入数据库后,bookAdded.jsp显示一条消息,showOneBook.jsp显示选定的书籍,showAllBooks.jsp显示数据库中的所有书籍。
index.jsp
<%@taglib prefix="stripes" uri="http://stripes.sourceforge.net/stripes.tld"%>
<%@page contentType="text/html" pageEncoding="UTF-8"%>
<!DOCTYPE html>
<html>
    <head>
        <meta http-equiv="Content-Type" content="text/html; charset=UTF-8">
        <title>Welcome page</title>
    </head>
    <body>

        <stripes:link href="addBook.jsp">
            Add a new book
        </stripes:link>

        <stripes:link href="findBook.jsp">
            Find one book
        </stripes:link>

        <stripes:link beanclass="com.zetcode.action.SelectAllBooksActionBean">
            Show all books
        </stripes:link>

    </body>
</html>
index.jsp包含指向两个 JSP 页面的 Stripes 链接,以添加一本新书并查找一本书,以及一个指向ActionBean的链接以显示所有书。 <%@taglib prefix="stripes" uri="http://stripes.sourceforge.net/stripes.tld"%>声明 Stripes 使用的标签,包括<stripes:link>。
findBook.jsp
<%@taglib prefix="stripes" uri="http://stripes.sourceforge.net/stripes.tld"%>
<%@page contentType="text/html" pageEncoding="UTF-8"%>
<!DOCTYPE html>
<html>
    <head>
        <meta http-equiv="Content-Type" content="text/html; charset=UTF-8">
        <title>Find a book</title>
    </head>
    <body>
      <stripes:form beanclass="com.zetcode.action.SelectOneBookActionBean">
            <stripes:errors/>
                Book ID:
                <stripes:text name="bookId"/><br>
                <stripes:submit name="save" value="Submit"/>
        </stripes:form>
    </body>
</html>
在findBook.jsp中,我们有一个表格,可通过其 ID 查找图书。 该表单包含一个文本字段和一个 Submit 按钮。 插入值已验证; 如果用户添加了无效值,则应用将返回错误消息。
addBook.jsp
<%@taglib prefix="stripes" uri="http://stripes.sourceforge.net/stripes.tld"%>
<%@page contentType="text/html" pageEncoding="UTF-8"%>
<!DOCTYPE html>
<html>
    <head>
        <meta http-equiv="Content-Type" content="text/html; charset=UTF-8">
        <title>Add new book</title>
    </head>
    <body>

        <stripes:form beanclass="com.zetcode.action.AddBookActionBean">
            <stripes:errors/>
                Author:
                <stripes:text name="author"/><br>

                Title:
                <stripes:text name="title"/><br>

                Year of publishing:
                <stripes:text name="published"/><br>

                Remark
                <stripes:text name="remark"/><br>

                <stripes:submit name="save" value="Submit"/>
        </stripes:form>

    </body>
</html>
addBook.jsp将一本新书添加到数据库中。 它包含一个带有四个文本字段的表单,用于书籍对象。 该 ID 由 Derby 数据库自动生成。
bookAdded.jsp
<%@page contentType="text/html" pageEncoding="UTF-8"%>
<!DOCTYPE html>
<html>
    <head>
        <meta http-equiv="Content-Type" content="text/html; charset=UTF-8">
        <title>Book added</title>
    </head>
    <body>
        <h3>Book added to database</h3>
    </body>
</html>
将新书添加到数据库后,应用返回bookAdded.jsp,其中包含一条简单消息。
showAllBooks.jsp
<%@page contentType="text/html" pageEncoding="UTF-8"%>
<%@taglib prefix="c" uri="http://java.sun.com/jsp/jstl/core" %>
<!DOCTYPE html>
<html>
    <head>
        <meta http-equiv="Content-Type" content="text/html; charset=UTF-8">
        <title>Show all books</title>
    </head>
    <body>
        <h3>All books</h3>

        <table>
            <thead>
                <tr>
                    <th>Id</th>
                    <th>Author</th>
                    <th>Title</th>
                    <th>Published</th>
                    <th>Remark</th>
                </tr>
            </thead>

            <c:forEach items="{actionBean.books}" var='book'>
                <tr>
                    <td>
                        <c:out value="{book.id}"/>
                    </td>
                    <td>
                        <c:out value="{book.author}"/>
                    </td>
                    <td>
                        <c:out value="{book.title}"/>
                    </td>
                    <td>
                        <c:out value="{book.published}"/>
                    </td>                     <td>
                        <c:out value="{book.remark}"/>
                    </td>
                </tr>
            </c:forEach>

        </table>
    </body>
</html>
showAllBooks.jsp显示从数据库检索到的所有书籍。 <%@taglib prefix="c" uri="http://java.sun.com/jsp/jstl/core" %>指令声明了 JSTL 核心标记,包括<c:forEach>和<c:out>。 可以使用${actionBean}表达式访问返回的数据,其中actionBean是转发视图(即此 JSP 页面)的操作 bean。 在这种情况下,操作 bean 是SelectAllBooksActionBean。
showOneBook.jsp
<%@page contentType="text/html" pageEncoding="UTF-8"%>
<%@taglib prefix="c" uri="http://java.sun.com/jsp/jstl/core" %>
<!DOCTYPE html>
<html>
    <head>
        <meta http-equiv="Content-Type" content="text/html; charset=UTF-8">
        <title>Show one book</title>
    </head>
    <body>
        <h3>A book</h3>

        <table>
            <thead>
                <tr>
                    <th>Id</th>
                    <th>Author</th>
                    <th>Title</th>
                    <th>Published</th>
                    <th>Remark</th>
                </tr>
            </thead>

            <tr>
                <td>
                    <c:out value="{actionBean.book.id}"/>
                </td>
                <td>
                    <c:out value="{actionBean.book.author}"/>
                </td>
                <td>
                    <c:out value="{actionBean.book.title}"/>
                </td>                       <td>
                    <c:out value="{actionBean.book.published}"/>
                </td>
                <td>
                    <c:out value="${actionBean.book.remark}"/>
                </td>
            </tr>

        </table>
    </body>
</html>
showOneBook.jsp显示一本书,我们通过其 ID 找到了它。
Book bean
Book bean 是一个 Java 类,代表我们应用的域对象-一本书。
Book.java
package com.zetcode.bean;

public class Book {

    private Long id;

    private String author;
    private String title;
    private int yearPublished;
    private String remark;

    public Book() {};

    public Book(String author, String title, int published,
            String remark) {

        this.author = author;
        this.title = title;
        this.yearPublished = published;
        this.remark = remark;
    }

    public Long getId() {
        return id;
    }

    public void setId(Long id) {
        this.id = id;
    }

    public String getAuthor() {
        return author;
    }

    public void setAuthor(String author) {
        this.author = author;
    }

    public String getTitle() {
        return title;
    }

    public void setTitle(String title) {
        this.title = title;
    }

    public int getPublished() {
        return yearPublished;
    }

    public void setPublished(int published) {
        this.yearPublished = published;
    }

    public String getRemark() {
        return remark;
    }

    public void setRemark(String remark) {
        this.remark = remark;
    }
}
Bean 具有必要的属性以及 getter 和 setter 方法。 请注意,还必须添加一个空的构造函数。
ActionBean
Stripes 的ActionBean是一个对象,该对象接收在请求中提交的数据并处理用户的输入。 它既定义了表单的属性,又定义了表单的处理逻辑。 最后,它向用户返回一个视图。 在我们的应用中,我们有三个动作 bean:AddBookActionBean,SelectAllBooksActionBean和SelectOneBookActionBean。 它们每个代表在应用中要执行的某些操作。
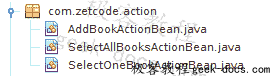
Figure: Action beans
我们将动作 bean 放入com.zetcode.action包中。
AddBookActionBean.java
package com.zetcode.action;

import com.zetcode.bean.Book;
import com.zetcode.service.BookService;
import net.sourceforge.stripes.action.ActionBean;
import net.sourceforge.stripes.action.ActionBeanContext;
import net.sourceforge.stripes.action.DefaultHandler;
import net.sourceforge.stripes.action.ForwardResolution;
import net.sourceforge.stripes.action.Resolution;
import net.sourceforge.stripes.validation.Validate;

public class AddBookActionBean implements ActionBean {

    private static final String VIEW = "/bookAdded.jsp";
    private ActionBeanContext context;

    @Validate(required = true)
    private String author;

    @Validate(required = true)
    private String title;

    @Validate(required = true)
    private int yearPublished;

    @Validate(required = true)
    private String remark;

    public String getAuthor() {
        return author;
    }

    public void setAuthor(String author) {
        this.author = author;
    }

    public String getTitle() {
        return title;
    }

    public void setTitle(String title) {
        this.title = title;
    }

    public int getYearPublished() {
        return yearPublished;
    }

    public void setYearPublished(int yearPublished) {
        this.yearPublished = yearPublished;
    }

    public String getRemark() {
        return remark;
    }

    public void setRemark(String remark) {
        this.remark = remark;
    }

    @DefaultHandler
    public Resolution addBook() {

        Book book = new Book(this.author, this.title,
                this.yearPublished, this.remark);
        BookService.saveBook(book);

        return new ForwardResolution(VIEW);
    }

    @Override
    public void setContext(ActionBeanContext context) {

        this.context = context;
    }

    @Override
    public ActionBeanContext getContext() {

        return context;
    }
}
在我们填写表格以添加新书后,将调用AddBookActionBean。 动作 Bean 自动将请求属性绑定到其自己的属性。
private static final String VIEW = "/bookAdded.jsp";
书籍成功保存到数据库后,AddBookActionBean返回bookAdded.jsp页面。
@Validate(required=true)
private String author;

@Validate(required=true)
private String title;
...
使用@Validate注解,我们为 HTML 字段提供了验证服务。 这些字段不能为空,并且必须与正确的数据类型匹配。
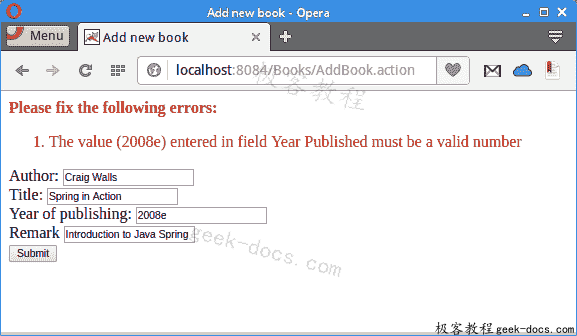
Figure: Validation
如果发布年份具有非整数字符,则“提交”操作将失败。
@DefaultHandler
public Resolution addBook() {

    Book book = new Book(this.author, this.title,
            this.yearPublished, this.remark);
    BookService.saveBook(book);

    return new ForwardResolution(VIEW);
}
@DefaultHandler注释指定此操作 bean 的默认处理程序方法。 (可以定义多个处理程序。)处理程序创建Book bean,调用BookService.saveBook()并转发到适当的视图。
SelectOneBookActionBean.java
package com.zetcode.action;

import com.zetcode.bean.Book;
import com.zetcode.service.BookService;
import java.io.IOException;
import net.sourceforge.stripes.action.ActionBean;
import net.sourceforge.stripes.action.ActionBeanContext;
import net.sourceforge.stripes.action.DefaultHandler;
import net.sourceforge.stripes.action.ForwardResolution;
import net.sourceforge.stripes.action.Resolution;
import net.sourceforge.stripes.validation.Validate;

public class SelectOneBookActionBean implements ActionBean {

    private static final String VIEW = "/showOneBook.jsp";
    private ActionBeanContext context;

    private Book book;

    @Validate(required=true)
    private Long bookId;

    public Book getBook() {
        return book;
    }

    public void setBook(Book book) {
        this.book = book;
    }

    public Long getBookId() {
        return bookId;
    }

    public void setBookId(Long bookId) {
        this.bookId = bookId;
    }

    @DefaultHandler
    public Resolution showOneBook() throws IOException {

        this.book = BookService.getBook(bookId);

        return new ForwardResolution(VIEW);
    }

    @Override
    public void setContext(ActionBeanContext context) {

        this.context = context;
    }

    @Override
    public ActionBeanContext getContext() {

        return context;
    }
}
单击findBook.jsp中的 Submit 按钮后,将调用SelectOneBookActionBean。
@DefaultHandler
public Resolution showOneBook() throws IOException {

    this.book = BookService.getBook(bookId);

    return new ForwardResolution(VIEW);
}
默认处理程序调用BookService.getBook()方法,然后转发到视图。
SelectAllBooksActionBean.java
package com.zetcode.action;

import com.zetcode.bean.Book;
import com.zetcode.service.BookService;
import java.util.List;
import net.sourceforge.stripes.action.ActionBean;
import net.sourceforge.stripes.action.ActionBeanContext;
import net.sourceforge.stripes.action.DefaultHandler;
import net.sourceforge.stripes.action.ForwardResolution;
import net.sourceforge.stripes.action.Resolution;

public class SelectAllBooksActionBean implements ActionBean {

    private static final String VIEW = "/showAllBooks.jsp";
    private ActionBeanContext context;
    private List<Book> books;

    public List<Book> getBooks() {
        return books;
    }

    public void setBooks(List<Book> books) {
        this.books = books;
    }

    @DefaultHandler
    public Resolution showAll() {

        this.books = BookService.getAllBooks();

        return new ForwardResolution(VIEW);
    }

    @Override
    public void setContext(ActionBeanContext context) {

        this.context = context;
    }

    @Override
    public ActionBeanContext getContext() {

        return context;
    }
}
SelectAllBooksActionBean负责从数据库中选择所有书籍。
@DefaultHandler
public Resolution showAll() {

    this.books = BookService.getAllBooks();

    return new ForwardResolution(VIEW);
}
调用BookService.getAllBooks()完成该工作。
服务
BookService包含与数据库通信的方法。
BookService.java
package com.zetcode.service;

import com.zetcode.bean.Book;
import com.zetcode.persistence.MyBatisDAO;
import java.util.List;

public class BookService {

    public static void saveBook(Book book) {

        MyBatisDAO mbd = new MyBatisDAO();
        mbd.saveBook(book);
    }

    public static List<Book> getAllBooks() {

        MyBatisDAO mbd = new MyBatisDAO();
        List<Book> books = mbd.findAll();

        return books;
    }

    public static Book getBook(Long id) {

        MyBatisDAO mbd = new MyBatisDAO();
        Book book = mbd.findBook(id);

        return book;
    }
}
DAO 模式用于使示例更易于移植。
public static List<Book> getAllBooks() {

    MyBatisDAO mbd = new MyBatisDAO();
    List<Book> books = mbd.findAll();

    return books;
}
getAllBooks()方法创建MyBatisDAO并调用其findAll()方法。 它返回检索到的书的列表。
DAO
数据访问对象(DAO) 模式用于将底层数据访问 API 或操作与高层业务服务分开。
BookDAO.java
package com.zetcode.persistence;

import com.zetcode.bean.Book;
import java.util.List;

public interface BookDAO {

  public void saveBook(Book book);
  public Book findBook(Long id);
  public List<Book> findAll();
}
访问数据的方法在BookDAO界面中定义。 当我们根据该接口进行编程时,代码的耦合较少。
MyBatisDAO.java
package com.zetcode.persistence;

import com.zetcode.bean.Book;
import com.zetcode.util.ServiceLocator;
import java.util.List;
import org.apache.ibatis.session.SqlSession;
import org.apache.ibatis.session.SqlSessionFactory;

public class MyBatisDAO implements BookDAO {

    @Override
    public void saveBook(Book book) {

        SqlSession session = null;

        try {
            SqlSessionFactory factory = ServiceLocator.getSessionFactory();
            session = factory.openSession();
            session.insert("insertBook", book);
            session.commit();

        } finally {

            if (session != null) {
                session.close();
            }
        }
    }

    @Override
    public Book findBook(Long id) {

        SqlSession session = null;
        Book book = null;

        try {
            SqlSessionFactory factory = ServiceLocator.getSessionFactory();
            session = factory.openSession();
            book = session.selectOne("selectBook", id);

        } finally {

            if (session != null) {
                session.close();
            }
        }

        return book;
    }

    @Override
    public List<Book> findAll() {

        SqlSession session = null;
        List<Book> retrieveList = null;

        try {
            SqlSessionFactory factory = ServiceLocator.getSessionFactory();
            session = factory.openSession();
            retrieveList = session.selectList("selectAllBooks");

        } finally {

            if (session != null) {
                session.close();
            }
        }

        return retrieveList;
    }
}
MyBatisDAO是BookDAO接口的具体实现。 如果基础数据源发生更改,我们可以轻松地切换到新的 DAO 实现。
@Override
public void saveBook(Book book) {

    SqlSession session = null;

    try {
        SqlSessionFactory factory = ServiceLocator.getSessionFactory();
        session = factory.openSession();
        session.insert("insertBook", book);
        session.commit();

    } finally {

        if (session != null) {
            session.close();
        }
    }
}
saveBook()方法将一本新书保存到数据库中。 创建一个SqlSessionFactory来产生一个SqlSession,这是使用 MyBatis 的主要 Java 接口。 工厂的创建委托给ServiceLocator。 会话的insert()方法使用给定的参数对象执行插入语句。 commit()方法将更改提交到数据库。
SqlSessionFactory factory = ServiceLocator.getSessionFactory();
session = factory.openSession();
book = session.selectOne("selectBook", id);
为了选择一本书,我们将id参数传递给会话的selectOne()方法。
SqlSessionFactory factory = ServiceLocator.getSessionFactory();
session = factory.openSession();
retrieveList = session.selectList("selectAllBooks");
selectList()方法返回书籍对象列表。
ServiceLocator.java
package com.zetcode.util;

import java.io.IOException;
import java.io.InputStream;
import java.util.logging.Level;
import java.util.logging.Logger;
import org.apache.ibatis.io.Resources;
import org.apache.ibatis.session.SqlSessionFactory;
import org.apache.ibatis.session.SqlSessionFactoryBuilder;

public class ServiceLocator {

    public static SqlSessionFactory getSessionFactory() {

        InputStream inputStream = null;
        SqlSessionFactory sqlSessionFactory = null;

        try {
            String resource = "mybatis-config.xml";
            inputStream = Resources.getResourceAsStream(resource);
            sqlSessionFactory = new SqlSessionFactoryBuilder().build(inputStream);

        } catch (IOException ex) {
            Logger.getLogger(ServiceLocator.class.getName()).log(Level.SEVERE, null, ex);
        } finally {
            try {
                if (inputStream != null) {
                    inputStream.close();
                }
            } catch (IOException ex) {
                Logger.getLogger(ServiceLocator.class.getName()).log(Level.WARNING, null, ex);
            }
        }

        return sqlSessionFactory;
    }
}
ServiceLocator从提供的配置文件中构建SqlSessionFactory。 该工厂随后用于生产SqlSession,这是与 MyBatis 进行通信的主要接口。
mybatis-config.xml
<?xml version="1.0" encoding="UTF-8"?>
<!DOCTYPE configuration
  PUBLIC "-//mybatis.org//DTD Config 3.0//EN"
  "http://mybatis.org/dtd/mybatis-3-config.dtd">
<configuration>

    <typeAliases>
        <typeAlias alias="Book" type="com.zetcode.bean.Book"/>
    </typeAliases>

    <environments default="development">
        <environment id="development">
            <transactionManager type="JDBC"/>
            <dataSource type="POOLED">
                <property name="driver" value="org.apache.derby.jdbc.ClientDriver"/>
                <property name="url" value="jdbc:derby://localhost:1527/books"/>
                <property name="username" value="app"/>
                <property name="password" value="app"/>
            </dataSource>
        </environment>
    </environments>
    <mappers>
        <mapper resource="BookMapper.xml"/>
    </mappers>
</configuration>
在mybatis-config.xml文件中,我们创建一本新书Book类型,定义 Derby 的数据源,并指定映射器文件。
BookMapper.xml
<?xml version="1.0" encoding="UTF-8"?>
<!DOCTYPE mapper
  PUBLIC "-//mybatis.org//DTD Mapper 3.0//EN"
  "http://mybatis.org/dtd/mybatis-3-mapper.dtd">

<mapper namespace="com.zetcode">

    <select id="selectAllBooks" resultType="Book">
        SELECT * FROM Books
    </select>

    <select id="selectBook" parameterType="long" resultType="Book">
        SELECT * FROM Books WHERE Id = #{id}
    </select>

    <insert id="insertBook" parameterType="Book" statementType="PREPARED">
        INSERT INTO Books(Author, Title, Published, Remark) VALUES
        (#{author}, #{title}, #{published}, #{remark})
    </insert>

</mapper>
在BookMapper.xml中,我们有应用中使用的 SQL 命令。 它具有两个选择和一个插入命令。
<select id="selectAllBooks" resultType="Book">
    SELECT * FROM Books
</select>
注意,对于结果类型,我们不定义集合,而是定义集合项的类型。
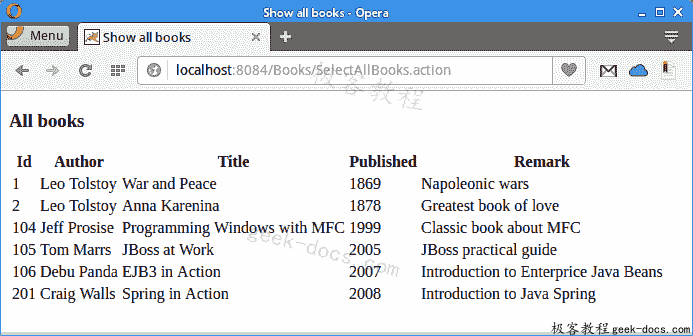
Figure: Displaying all books
屏幕截图显示了从示例数据库中选择的所有书籍。
在本教程中,我们使用 Stripes,MyBatis 和 Derby 创建了一个 Web 应用。 我们使用了三层 DAO 软件模式。 NetBeans 用于构建应用。